You’ve planted and tended to your garden faithfully and are ready to reap what it offers.
Or maybe you had too much on your plate this summer and your garden got tended not so faithfully…
Whatever it may be, now that we’ve entered September, the month of harvesting, you’re starting to see color peeking through the vines or weeds.
And you’re wondering about your winter squash and pumpkins.
- When to harvest?
- What to do with them after harvesting?
- How long will they store?
- How to use them all up?
So many questions come up once you feel the fall season is upon us.
That’s what I’m here for! I’m here to help with all your questions about winter squash, harvest, curing, storage, cooking and more!
How to successfully harvest your winter squash and pumpkins
Harvesting winter squash and pumpkins is extremely satisfying. My children love to help and love to admire the finished harvest.
First things first, don’t harvest too early because although the fruits might look ripe, their flavor is not well developed and will definitely disappoint if you harvest too early. We like to wait until at least September to harvest, better into mid-September for best flavor.
But no worries if you do harvest too early. All you have to do is wait a few more weeks for your squash to taste the way you remember it!
Best harvest practices:
- Begin your harvest on a warm sunny dry day in September. Right before a hard frost is a good time or right after a light frost also works.
- Use clippers to cut through the stems of the winter squashes and pumpkins. Do not rip the plants off the vines with your hands. Why not? Because you risk having the stem caps snap off at the fruit which makes them more likely to rot in storage.
- Handle the fruits gently. Do not throw them into your harvest containers. If they bruise they are more likely to rot.
How to successfully cure your winter squash and pumpkins
Curing winter squash and pumpkins is easy! It’s a process that our whole farm looks forward to because every day you get to take stock of your crop!
But why should you do it?
It gives the fruits the chance to toughen up their skins and dry off the cut stem area (which weeps when fresh harvested) so that they store better. Curing also gives the fruits the chance to start ripening up further for better flavor.
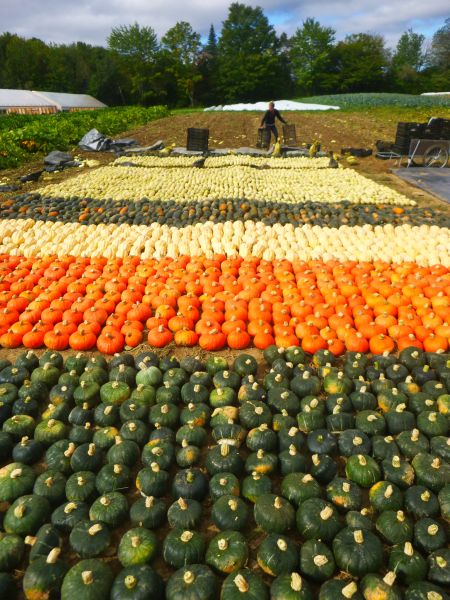
Curing locations depend on what resources you have on hand. We harvest thousands of fruits so we “field cure” ours right in place in the field where they were growing. We move aside any remaining weeds or vines and lay them right on the garden soil.
Best curing practices:
- Decide a good place to cure your fruits. Options include: in a greenhouse, on your porch or in the front yard in short grass, on the bare garden soil, etc. Just make sure it is a place where there is good air flow, few weeds and/or places for rodents to hide who want to eat your fruits, and an easy place for you to access daily.
- Decide how you will protect your squash from cold night temperatures and/or rain. We use a large tarp that we pull over the fruits if the temp is to go much below 50 degrees. You can also plan to bring your fruits in onto the porch or garage if there is a threat of frost.
- Keep your fruits out in the sunshine each day for a few days (we do at least 3 and up to 7 days depending on what works with our farm schedule). Bring under cover if there is rain or frost in the forecast.
How to successfully store your winter squash and pumpkins
Winter squash and pumpkins are one of the easiest things to store in your home! No need for a fancy root cellar or even a basement. Actually it is a myth that winter squash stores best in the basement. It doesn’t!
It actually stores best at cool room temperature, which should be achievable in anyone’s house!
Best storage practices:
- Find a location in your house that is around 60 degrees.
- Store your fruits in containers single layer deep. You can store them on newspaper if you want to protect the surface underneath. We stored ours on a bookshelf once and learned this lesson the hard way. Why? Because some of the fruits start to rot over the storage life. And that can affect the surface under your squash.
- Leading us to the next point, check your squashes every week or two for signs of decay. Then move them out of storage and into your kitchen where you can cook them up and eat them or preserve them for later.
- How long will your squash store? Well cured squash stores a minimum of a couple months. Some varieties are designed for long storage and they will store all winter long when properly cared for and monitored.
How to successfully use your winter squash and pumpkins
BONUS! You don’t think I’d leave you hanging, do you?
My specialty is cooking with winter squash and pumpkins! Once the time comes, and oh, is it coming soon, I put them into everything from soups, to stews, to casseroles, to chocolate cakes!
On our website’s recipe gallery, we have many ideas for cooking your squashes and pumpkins.
- Acorn squash recipes here
- Buttercup squash recipes here*
- Butternut squash recipes here
- Delicata squash recipes here
- Pumpkin recipes here
- Mini pumpkin recipes here
- Red Kuri squash recipes here*
- Sunshine squash recipes here*
- Tetsukabuto squash recipes here
- Blog post on using up extra squash: What to do with all that squash!
* These three squashes (Buttercup, Red Kuri, and Sunshine) are all similar enough to substitute for each other in recipes.
How to successfully save seed from your winter squash and pumpkins
BONUS #2! This is a surprisingly frequent question we get as farmers!
You can absolutely save seed from your pumpkins and winter squash. But please know that many can cross pollinate with each other if they are in close enough proximity.
This means that saved seed from your garden or ours might not look like the squash you got it from. Volunteer squash is often a mix of squashes that were grown in proximity to that garden spot.
If you want to learn more about how to isolate your squash plants to be able to save seed from your variety, check out this informative blog post from Dave’s Garden.
Great post! Thank you for such practical information and perfect timing. Getting the squash cured is always a challenge for me. I might use the driveway this year.