The busy summer can have you constantly running from this to that, right?
And it is hard to find time to slow down and do something spontaneous.
I understand. I’m a farmer and full-time mama.
But, who doesn’t love slowing down to enjoy the beauty of nature and picking some gorgeous flowers along the way?
I know that I always find joy in picking flowers. Even just a small handful. Something about being outside and seeing all of the pretty blooms gently blowing in the breeze persuades me to be an authentic part of it.
And cutting flowers does that for me. It centers me and brings me back to a peace.
And it seems to do the same thing for kids! I can't tell you how many times my two girls have already begged me to go pick flowers this year (and they are juuuuust starting!)
No matter if you've got a flower garden or a nearby native wildflower meadow or you're a member of our Summer CSA (we have a free perk of Pick-Your-Own flower gardens for members), I'm sure that you'll agree with me that picking flowers is relaxing, creative, and fun!
Plus, bringing the bouquet inside brings joy into the house for a week! Here's a bouquet that a CSA member made:
But wait?
I don’t know how to pick flowers…
I don’t want to mess up the pretty gardens…
I’ve picked flowers before but they get all gross in the vase and don’t last…
If this sounds remotely like you, this post is for you! I will help you see how easy it is to pick your own bouquet and make it last with these seven steps.
How to Pick Your Own Bouquet And Make it Last
Step #1: Understand when the flowers are at the optimal stage for picking.
Really, if you do anything, do this!
Identify stalks on which the flowers are starting to open, but not all are fully open. Picking at this stage means that they will slowly unfurl for you over the course of the week. Making them look fresher and stay beautiful longer.
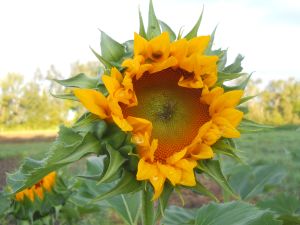
For a single flower per stem, cut it when the flower isn't fully open. See the picture below for an example of a sunflower. This is the right stage to pick at. For a plant that has a cluster of flowers on a stem, look for one that has approx 1/3 of the flowers open and the rest still to open for the best performance.

Step #2: Cut a long stem.
Longer than you’d think. Ideally the length of your arm or as long as you can if the plant is short.
But, wait, all my flowers are not the same length!
Wait, we'll get to that and fix it!
Cutting a nice long length is important because it is more flexible in the arranging stage. It leaves you the option for the tallest bouquet possible. You can cut it down later, but can’t make it longer again. In the case of short plants, you'll want to cut almost at the ground to make it long enough to go with your other flowers.
Step #3: Strip the leaves off in the field.
Yes, this is KEY to making your bouquet last.
And once you get some practice you can do this very quickly and efficiently.
When you’re first starting to strip the leaves, be careful to not pinch and/or bend the stem, because doing so will reduce the shelf life of it.
To do it fast, take your fingers around the stem towards the flower end and pull towards yourself sliding down the stem. Or just pick the leaves off of the stem one by one (more time consuming).
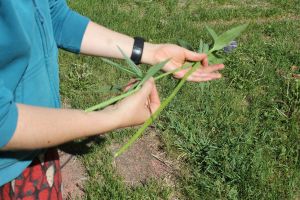
In the end you’ll want the lower portion of your stems to look “naked” like in this pic below. Leaving leaves on that will go in the water in the vase can cause a premature decline of the bouquet as they start to rot.

Step #4: Arrange your flowers into your masterpiece.
Once you have picked a bunch of flowers, stripped off the leaves, you are ready to arrange.
Put the flowers down on a table or the grass and sort through them. Hold your bouquet in your hands and add to it stem by stem until you have something you like!
And don't tell me you're not good at it!
There is no right or wrong way to arrange so go for it.
Step #5 Cut the stems off all at the same height.
You can do this with your clippers/scissors. This will make your bouquet more manageable to take home with you in the car as well as just to plop down into a vase at home to enjoy all week.
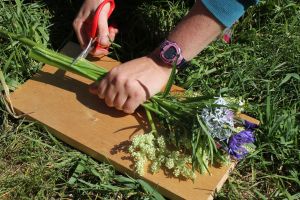
Depending on the height of your vase, you may need to trim the flowers again at home as desired. Here’s a pic of me doing this with a small bouquet I picked recently:

Step #6: Keep your bouquet's stems moist on the way home.
Flowers like water, most people know this, and without it they will wilt quickly. So your best option is to bring a little vase, or bucket, or something else to hold a little bit of water in and bring home with you in the car.
Another good option that CSA members like to do is to wet paper towels and wrap them around the bottom of the bouquet and then put a plastic bag over this for the drive.
Whatever way you chose, it is a good idea to keep those beauties wet. They’ll love you for it!
Step #7: Change the water everyday.
This is a big one. Having been cut off the plant, cut flowers are literally living on the water in the vase. They drink it. So it is a good idea to give them fresh water every day. Doing this will absolutely keep them longer for you. Up to a week!
If you are a member of our 2022 Summer CSA program, you can learn more about Ripley Farm's PYO by visiting our page here.
What did you think?
Do you have any tips for making your bouquets last well in the vase? Hit reply and let me know!
Picking flowers is one of the most relaxing and renewing things I do for myself (or I do with my kids) in the summer, and I know you will feel the same way, too!
