“Mmmm! What is in this soup?”
Soup is one of the things I serve that I get the most complements on.
Why? It’s kind of like building a house. It needs to start with a solid foundation or else it won’t be very successful.
Soup is the same way. And broth is that foundation.
Broth is a magical ingredient in soup that you can’t see, but makes it taste so much better.
Because I love good tasting food, it is something that I don’t like to compromise on. And when you have tasted homemade broth, you’ll know why.
Not only does broth taste great, but it also helps reduce waste from your vegetable scraps. And captures all of those great nutrients from the food you might otherwise throw away.
I started doing it many years ago and have never looked back. It is practically as easy as boiling water and will go smoothly for you, too, if you follow my tips below!

Have you ever made your own? If not, here’s how:
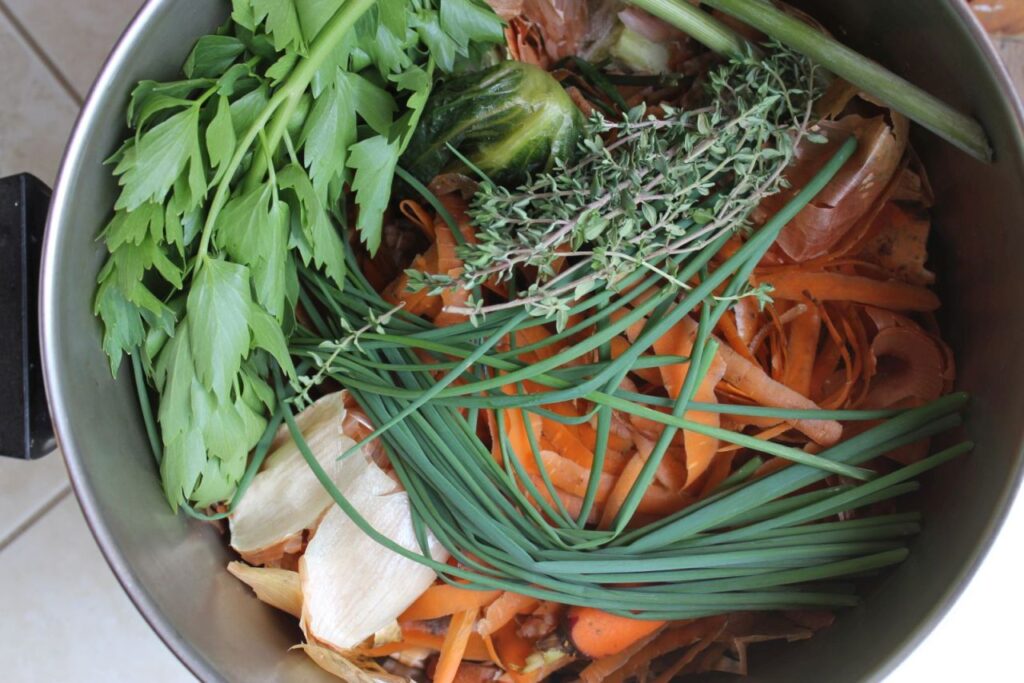
First, save your vegetable scraps! Just put them into a gallon ziplock bag in the freezer and add to it as you have more. When it’s full you know it’s time to make a broth by dumping them into a pot, covering with water and simmering. It is really easy and here are some great tips to get you on your way to doing it today!
So can I just put everything in?
Yes, and no. You can put in a lot of things, but there are some definite no-no’s to homemade broth that will make or break the taste.
Core components of broth (chopped):
- Carrots: chopped roots, butts, skins, trimmings
- Onions: chopped bulbs, butts, skins, trimmings
- Celery/celeriac root: chopped roots, butts, trimmings (or you can substitute celery seed here)
Other vegetables/vegetable scraps you CAN include (chopped) in smaller amounts:
- Leeks: chopped stalk, tops, peelings, trimmings
- Green onion (scallion) tops: chopped stalk, trimmings
- Carrot tops in limited amounts
- Squash: peels, trimmings
- Garlic: whole cloves, trimmings, peels
- Sweet Peppers: trimmings
- Tomatoes: trimmings
What NOT to include (and why not):
- Anything that is rotten or moldy. Throw that in the compost. Obviously!
- Anything that will cause bitterness: The biggest culprits that will do this are in the brassica family, for example kale, broccoli, cabbage, turnips, rutabaga, kohlrabi, Brussels sprouts, as well as zucchini can also do this.
- Anything that will darken your broth: Dark greens like spinach, swiss chard, etc., and beets
- Anything that will cloud or change the consistency of your broth: Potatoes, eggplant, or other potentially starchy or mealy veggie scraps.
- Anything that will intensify the flavor of your broth: Herbs can go a long way so be careful with how much you add or else it will taste like medicinal tea and you won’t like it!
Optional non-vegetable ingredients:
- Chicken and beef bones or other bones (these will turn yours into an extra rich bone broth!)
- Parmesan cheese rinds (never tried this but want to!)
- Wine (I usually don’t use this, but have before.)
Step-by-step guide to how to make your homemade broth:
- Put all chopped vegetables, vegetable scraps in a stock pot. The more vegetables you have, the more stock you will make.
- Add optional seasonings of garlic, parsley, thyme, bay leaf, peppercorns, basil, etc. Just be mindful of how you plan to use it when you decide on what seasonings you want.
- Add optional non-vegetable ingredients like chicken bones if you have them and want to. This makes it chicken vegetable broth which is also yummy!
- Cover the ingredients with water. Don’t over fill it with water or your broth will be diluted.
- Bring to a boil and then reduce to a simmer. Simmer for 1-2 hours.
- Taste the broth throughout; if you like the taste at 1 hour, then you should stop it at that time. Letting it simmer too long risks a bitter broth.
- When you are satisfied with the taste, remove from heat.
- Strain the broth into a bowl that you can put a lid on or canning jars. Discard mushy vegetables. You just got all the goodness out of them!
- Store in your fridge for up to a week.
- Make great tasting meals with your homemade broth!
How to freeze your broth:
I will put a plug in here for freezing your broth. I am a super big fan of soups. And one of the things that helps me make them often is having a good supply of homemade broth in my freezer. It’s so easy to just pull it out and whip together a soup, instead of having the extra step of making the broth at the same time!
Freezing broth is easy! Simply put it into freezer safe containers, label with contents and date, and store in the freezer for up to 6 months.
But, what kind of containers? Decide what amounts you’ll want to use at a time.
- I use plastic ziplock freezer bags either quarts or gallons. I like to use my broth to make soup.
- You can also use plastic Tupperware containers, old yogurt containers, etc.
- If you want to use glass, use wide mouth pint or pint-and-a-half jars which are straight-sided and freezer safe.
- Or ice cube trays if you only want to use a little bit at a time. Freeze them in there and pop them out into a ziplock freezer bag to store them.
Our favorite ways to use homemade vegetable broth:
- Substitute it in any recipe for chicken broth!
- Soup: OMG I love soup! This is of course my favorite way to use broth! There are SO many good soup recipes on our website but, here’s one of my favorites anytime of year to try: Curried Carrot Soup! Find this and several other good carrot soups on our Carrot page of the Vegetable Gallery of Recipes.
- Stews: Try this delicious one for Stewed Kohlrabi on our Kohlrabi recipe page.
- To cook grains in like rice or quinoa. Here’s my go-to rice recipe for Jasmine Rice:
2 cups jasmine rice, rinsed
3 cups broth.
Bring to a boil, and turn down to the lowest heat possible covered for 25 minutes. All the liquid should have evaporated out and the rice will be cooked. - To cook beans with veggies! Here’s a new one that I just made: Stewed Kale with Dried Beans found on the Kale page.
- To cook lentils with veggies! Here’s my go to: Indian-style Red Lentils with Zucchini found on the Zucchini page.
